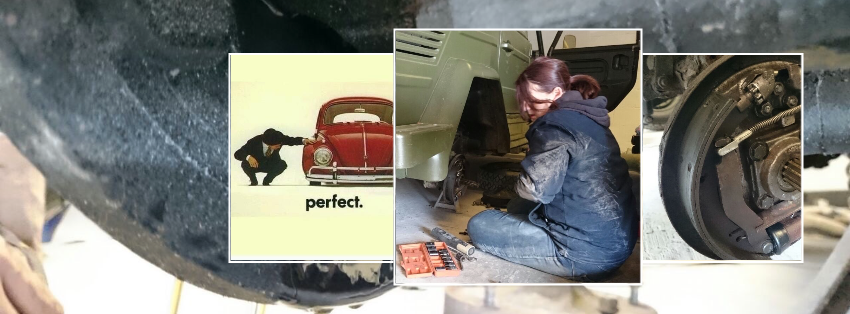
TECHNICAL INFORMATION PAGE
- Posted by: Kate McCarthy Bedward
- March 19, 2016
- Contact Page,
We get many questions each day beginning often with the words 'How do I...' - so we figured we'd start sharing answers for the benefit of all our visitors and
Classic Volks supporters.
Classic motoring - Oil Bath air cleaner - General Advice Posted: March 23,2016
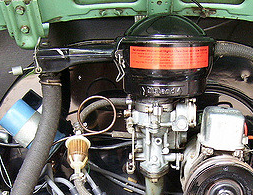 Maintenance is all about keeping the car, primarily the engine, in good working order. At this time we remind our readers to keep the air filter
and fuel filter clean. Depending on the year of your VW and/or customisations made, ensure that about every 1,000 miles (or on a monthly basis) remove the air cleaner and
clean it out, checking too on the oil level residing in the air cleaner bath. If it is dirty then
empty it, wash out any sludge and refil with oil. To check the level of oil in the filter bowl, all you need to do is undo the two clips securing the top cover
and lift it off. The oil should be in line with the visible mark: have a look. For the sludge deposits, check that the oil is no less than say 4-5 mm deep above any sludge.
Maintenance is all about keeping the car, primarily the engine, in good working order. At this time we remind our readers to keep the air filter
and fuel filter clean. Depending on the year of your VW and/or customisations made, ensure that about every 1,000 miles (or on a monthly basis) remove the air cleaner and
clean it out, checking too on the oil level residing in the air cleaner bath. If it is dirty then
empty it, wash out any sludge and refil with oil. To check the level of oil in the filter bowl, all you need to do is undo the two clips securing the top cover
and lift it off. The oil should be in line with the visible mark: have a look. For the sludge deposits, check that the oil is no less than say 4-5 mm deep above any sludge.
If you need to remove the sludge then the lower half of the unit will need to be removed from the carburettor. Again, if none of this is making sense, send us a picture
of your engine and we'll clarify. If you understand, then read on: Slacken the clip at the base of the cleaner and pull off the air heater and crankcase breather hoses.
Carefully lift off the bowl (to avoid spillage). While we are on this area of work, check that the counter weighted flap on the air cleaner inlet tube is free to move. A more detailed
technical write up will be posted for more experienced VW owners, for now, simply carrying out the above and other basic checks and maintenance will help reduce
your engine wear and prolong your dubDays.
Aircooled - About Airflow
Importance of Tinware
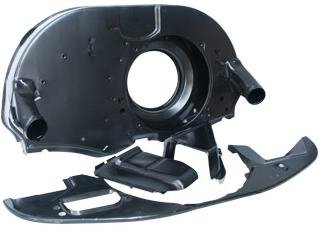
The cooling system used by Volkswagen in our beloved classics is simple and effective. A multi-bladed fan is mounted on a shaft which extends
from the generator. This fan rotates and draws air into the fan shroud/housing and utilising the tinware designed and used throughout the engine compartment, controls the running temperature of the engine.
Having all necessary tinware in place is therefore important, as is maintaining their condition. For example, few remember to
clean the fan and the fan shroud from time to time - doing so will increase your engine/running life. Painting the fan shroud is a nice touch and if doing so, black is a good colour choice for shedding heat.
See: Machine 7 or Just Kampers for quality parts.
VW Running Care
Routine Maintenance
The fan housing and cover plates are held in position by cheese head (flat head screw-driver required) screws which should
be checked for tightness each month. Replace missing screws immediately. Each month, check the fan belt tension. The
fan it drives is indispensible for aircooled engines, even for short drive distances and if it slips or breaks, severe
damage will be caused. We suggest you always carry a spare fan belt. Check that the spark plug leads are in good condition and fit correctly.
Check the heat exchangers - leaks can result in exhaust fumes being forced directly into the car. Care must also be taken to ensure that the lubrication system
is not neglected as the engine oil plays a more significant part in engine cooling.
Solex Carburettor - Description
- VW Beetle, Campervan, Ghia, Kurierwagen, all
- Manufactured by Volkswagen
- Source: Haynes vw1200 Beetle
 The carburettor is basically a tube through
which air is drawn into the engine by the action of the pistons and en route, fuel is introduced into the air stream in the tube due to the
fact that the air pressure is lowered when drawn through the 'tube'. A scent spray works on the same principle. The main fuel discharge point
is situated in the 'tube' between two flaps which can be blocked off the tube - Choke is the proper name for the tube and will be used from here on.
One of these is the throttle flap - operated by the accelerator pedal and positioned at the engine end of the choke tube. The other is the strangler - which
is operated by a manual knob or an automatic device.
The carburettor is basically a tube through
which air is drawn into the engine by the action of the pistons and en route, fuel is introduced into the air stream in the tube due to the
fact that the air pressure is lowered when drawn through the 'tube'. A scent spray works on the same principle. The main fuel discharge point
is situated in the 'tube' between two flaps which can be blocked off the tube - Choke is the proper name for the tube and will be used from here on.
One of these is the throttle flap - operated by the accelerator pedal and positioned at the engine end of the choke tube. The other is the strangler - which
is operated by a manual knob or an automatic device.
When the engine is warm and running normally, the strangler is wide open and the throttle open partially or fully - the amount of fuel/air mixture at this point is being controlled
according to the required speed. When the engine is cold, the strangler is closed - partially or fully and the suction therefore draws more fuel or less air, i.e. a richer
mixture to aid starting a cold engine. At idling speeds the throttle flap is shut so that no air and fuel can get to the engine in the regular way. For this there are
separate routes leading to small holes in the side of the choke tube, on the engine side of the throttle flap. These 'bleed' the requisite amounts of fuel and air
to the engine for slow speeds only.
The fuel is held in a separate chamber alongside the choke tube and its level is governed by a float so that it is not too high or low. If too high, it
would pass into the choke tube without suction. If too low, it would only be drawn in at a higher suction than required for proper operation. On later 1200 engines a power
fuel system is an additional source of fuel which improves performance at high engine speeds when the main jet cannot pass enough fuel. It is in effect a supplementary main jet.
The strangler flap is controlled by either a manually operated wire on early models or an electrically operated bi-metal strip. This latter consists of a coiled bi-metal
strip connected to the choke flap spindle. When the ignition is switched off, the coiled metal strip is cold and the flap is shut. When the ignition is switched on, current flows
though the strip which heats it up and it uncoils - this opend the choke flap after two to three minutes.
The carburettor should not be dismantled without reason. Such reasons would be for cleaning or renewal of the float and needle valve assembly and, in rare
circumstances, the jets. Partial dismantling would also be necessary for checking and setting the float chamber fuel level.
Aircooled VW Throttle cable replacement
- LHD VW Trekker 1972, throttle cable replacement
- K-Ghia, Beetle/Bug, 1966-1971, Accelerator cable
- 1966-71 acccelerator cable length 2635mm
 A few days ago while driving the Trekker home from work, I pressed
on the accelerator to pull out from a junction and 'thunk' - the accelerator pedal fell flat to the floor as did my stomach thinking
the guy driving behind me was about to run into the back of my Trekker. That didn't happen, so out I jumped and promptly pushed the Trekker
off to the side of the road and out of dub reflex, flipped the engine bay lid up to investigate further.
A few days ago while driving the Trekker home from work, I pressed
on the accelerator to pull out from a junction and 'thunk' - the accelerator pedal fell flat to the floor as did my stomach thinking
the guy driving behind me was about to run into the back of my Trekker. That didn't happen, so out I jumped and promptly pushed the Trekker
off to the side of the road and out of dub reflex, flipped the engine bay lid up to investigate further.
As you'd expect given the above description of events, the Throttle or Accelerator cable had snapped - just before the section that is held by
the connector on the carburettor - so a bit was still connected to the carburettor, the other bit dangling from the throttle cable tube
(which runs through the fan housing).
A bit of head-scratching and rummage through the dub life survival kit, (cable tie, duck-tape etc.) and soon
enough my dub-wife arrived on the scene with the expected smile that only another dubber would contribute to these kinds of incidents. We soon
fashioned a plan. Use enough of her VW Campervan curtain wire to run from the lower arm of the carburettor throttle arm, run it under the rear bumper
then through the front window then ...no? Fine. We went with her plan and fashioned a loop on the extend bit of throttle cable then used cable ties
to attach it to the return spring/throttle arm on the carburettor. Worked a treat; got me home.
Fast forward 3 days and £7 later, (my wife having bought a new accelerator cable length:2635mm *lengths vary) - it was time to replace the accelerator/throttle
cable on my left-hand-drive 1972 VW Type 181 Trekker. I'm being specific on the make/model/year because you will need to do a bit of research (or simply email us info@classicvolks.com) for
what length cable you need for your own Aircooled Volkswagen.
 Replacing the accelerator cable is a relatively simple task (10-15minutes)
but as many aircooled dubbers know, many '10 minute' jobs often encounter snags; rusted-fast/rounded nut heads being the usual cause of heart, back and head ache.
But I tell you what, this task for me was by far one of the easiest to date. If you are as lucky as I was, you won't even need
to jack the car up and take the left wheel off but do bear those two things in mind as you may very well need to in order to
continue feeding the accelerator cable through the cable tube which protrudes into the engine bay area.
Replacing the accelerator cable is a relatively simple task (10-15minutes)
but as many aircooled dubbers know, many '10 minute' jobs often encounter snags; rusted-fast/rounded nut heads being the usual cause of heart, back and head ache.
But I tell you what, this task for me was by far one of the easiest to date. If you are as lucky as I was, you won't even need
to jack the car up and take the left wheel off but do bear those two things in mind as you may very well need to in order to
continue feeding the accelerator cable through the cable tube which protrudes into the engine bay area.
What's to come: undoing the cable from the barrel clamp on the carburettor; pair of pliers and
an 8mm spanner to disconnect the throttle cable (i'll refer to is as throttle rather than accelerator) - good idea to have some grease (not essential) to
lightly rub on to the new throttle cable to ease feeding it through the tunnel. That's about it. To start, note the image left of this body of text; there are no tools required to disconnecting that
end of the cable. The next image below (number 3.) shows the throttle cable protruding through the tube, awaiting connection to the carburettor.
Got the gist?, okay, let's run through it then.
 1. Start with disconnecting the throttle cable from the carburettor by
loosening the screw in the barrel clamp (in the throttle arm) on the carburettor. In my case, the cable was already snapped just there so really all I needed to do
was undo the make-shift tie done to get me home when it first broke.
1. Start with disconnecting the throttle cable from the carburettor by
loosening the screw in the barrel clamp (in the throttle arm) on the carburettor. In my case, the cable was already snapped just there so really all I needed to do
was undo the make-shift tie done to get me home when it first broke.
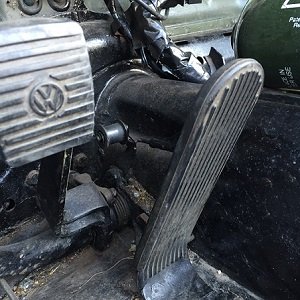
2. Now go to the accelerator pedal area and DO NOTHING. What I want you to do first,
before you take the throttle cable out, is look carefully at the direction that the 'S' bend on the throttle cable is fed. If you feed the new cable through without paying attention to how
it is done correctly, the cable will slip off/ become disconnected from the accelerator pedal; while driving! Not good.
Now, with notes made, unhinge the throttle cable (per pic. number 4) - and begin pulling the old throttle
cable through. Assuming there isn't any blockage along the way, it takes seconds to pull all the cable out.
 3. You can now start feeding the new throttle cable in, via the hole on the accelerator pedal arm (pic. 4 for guidance) and it's
not a bad idea to lubricate the cable with grease as you push it into the tube.
3. You can now start feeding the new throttle cable in, via the hole on the accelerator pedal arm (pic. 4 for guidance) and it's
not a bad idea to lubricate the cable with grease as you push it into the tube.
Continue feeding the cable through the tunnel as far as it will go. With luck, when you now check you will find the rear end
of the cable protruding from the flared tube in the engine bay close to the carburettor.

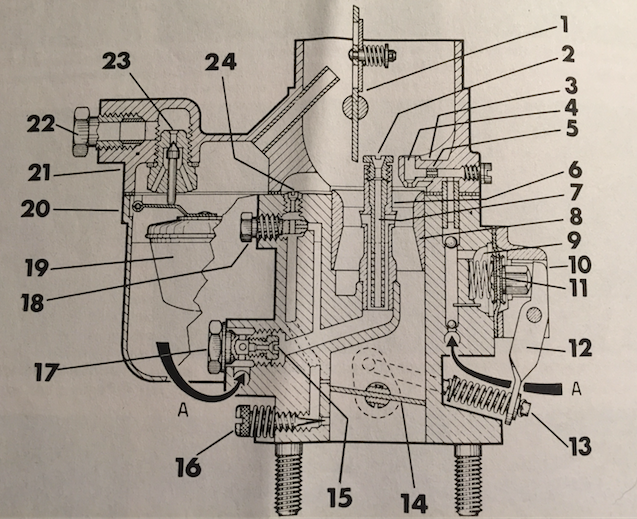 1.Strangler flap 2.Correction jet 3.Accelerator pump injector 4.Air bleed 5.Pump jet 6.Main jet bridge 7.Emulsion tube
8.Choke tube 9.Pump diaphragm spring 10.Accelerator pump 11.Pump diaphragm 12.Pump lever 13.Pump operating rod 14.Throttle flap
15.Main jet 16.Slow running mixture adjusting screw 17.Main jet carrier plug 18.Pilot jet 19.Float 20.Carburettor body
21.Top cover 22.Fuel inlet union 23.Needle valve assembly 24.Pilot jet air bleed
1.Strangler flap 2.Correction jet 3.Accelerator pump injector 4.Air bleed 5.Pump jet 6.Main jet bridge 7.Emulsion tube
8.Choke tube 9.Pump diaphragm spring 10.Accelerator pump 11.Pump diaphragm 12.Pump lever 13.Pump operating rod 14.Throttle flap
15.Main jet 16.Slow running mixture adjusting screw 17.Main jet carrier plug 18.Pilot jet 19.Float 20.Carburettor body
21.Top cover 22.Fuel inlet union 23.Needle valve assembly 24.Pilot jet air bleed 1.Guide Tube (runs through the fan housing)